
Syntax's First Signature Tutorial
Step 1: To start off create a new canvas roughly around 330x110pixels.
Step 2 The Background: Once you have found a render you would like to use open it up. Take your Eye Dropper tool and choose two colours you would like to use for the background colours. After you have chosen your two colours go back to your blank canvas and double click on the lock to unlock the layer. From there go to Layer > Layer Style > Gradient Overlay. Choose the two colours from the render and leave it.
Step 3 The Stock Images: The next step is to add some stock images into your signature to give it some texture. To do this go to www.google.com and choose some images that will relate to your signature. For this I chose the Canucks Vintage logo. Once you have added your stock image into the signature by going to edit > paste go to Image > Adjustments > Desaturate. Set the layer on overlay and change the opacity to around 30-40%. Here is my outcome..

Step 4 The Stock Images: Repeat step three this time use a different stock image.

Step 5 The Render: Take your render and move it into the signature. If it doesn't fit resize it.

Step 6 Blending In The Render: Duplicate your render layer then go to image > adjustments > desaturate then filter > sharpen > sharpen. Lower the opacity and change the layer setting to either Soft Light or Overlay. Whichever looks best.

Step 7 B&W Gradient Map: For this step go to Layer > New Layer then Image > Apply Image. Once you have done that go to Image > Adjustments > Gradient Map. Choose the black and white gradient map and change the layer settings to Multiply on 30%.

Step 8 Purple & Orange Gradient Map: Once again create a new layer by going to Layer > New Layer. Then go to Image > Apply Image. From there go to Image > Adjustments > Gradient Map. Choose the Purple and Orange gradient map and change the layer settings to Soft Light around 50%.

Step 9 Purple & Orange Gradient Map Take Two: For this step go to Layer > New Layer then Image > Apply Image. From there go to Image > Adjustments > Gradient Map. Choose the Purple and Orange gradient map and set the layer to pin light at 10%.

Step 10 Gauassian Blurs: Once again create a new layer and go to Image > Apply Image. From there go to Filter > Blur > Gauassian Blur and change the settings to 3. After that change the layer settings to lighten at 50%
Step 11 Gauassian Blurs: Create a new layer then go to Image > Apply Image. From there go to Filter > Blur > Gauassian Blur. Once you have done that change the layer to Overlay at around 30%.
Step 12 Gauassian Blurs: Create a new layer then go to image > apply image. From there go to Filter > Blur > Gauassian Blur. Set this layer on Linear Dodge around 10%.
Step 13 Brighten The Image: For this step go to Layer > New Layer then Image > Apply Image. After that go to Image > Adjustments > Brightness/Contrast and mess around with the settings until you get something you like.
Step 14: Light Texture: For this part of the signature you're going to have to go to www.deviantart.com and download some Light Texture. Just search Light Texture and something should come up in photoshop. Once you have done that open them up in photoshop. Be sure to extract the files if you have to first however. After you have completed that add it to your signature and set the layer to Lighten at around 80%.. If you want to add more feel free to.
Step 15 Brushing: Go to layer > new layer and take out a nice brush. Just brush lightly around your render until you get something you like. Be sure to use the colour white when brushing.
Step 16 Sharpening The Image: Go to Filter > Sharpen > Sharpen and set the layer to around 80%.
Step 17 Add Text: Add text and place it somewhere nice in the signature.

Step 18 Finishing Touches: For this step I used another tutorial..
Link: http://www.dutchdesignz.com/forums/showthread.php?t=150
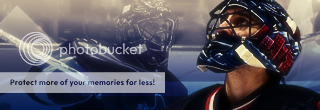
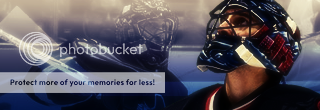
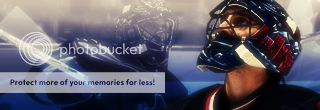
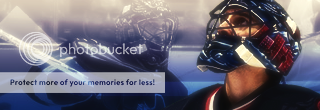
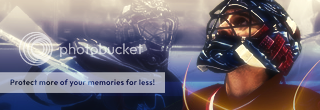
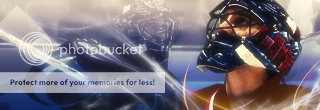
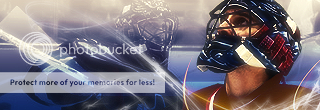
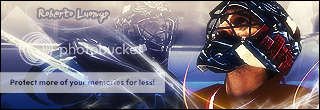
Finished Work:
Please don't post this anywhere else unless you have my permission, thanks.
Last edited:
")