
I'm still a beginner with all of this graphic stuff, so I may make some mistakes :lol:.
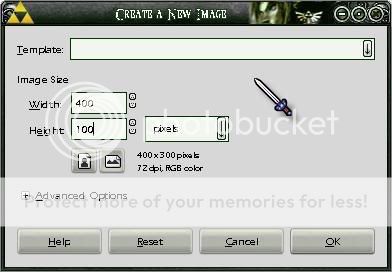
Step 1
To make a sig you must have an image size, so what i usually pick is 400 x 100.
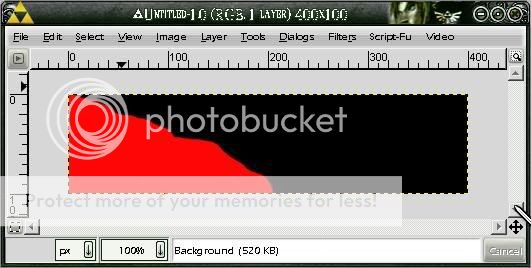
Step 2
Fill the background color with black. Then make a blob of red at one of the corners with your brush. It should look something like this...
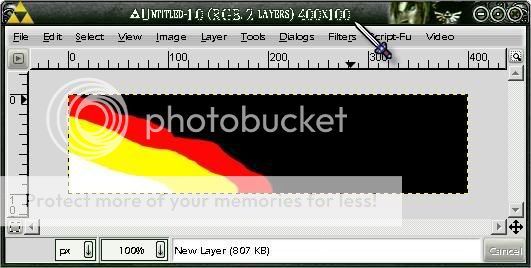
Step 3
Next, make a new layer (Layer > New Layer), then paint both yellow and white on top of the red like so...
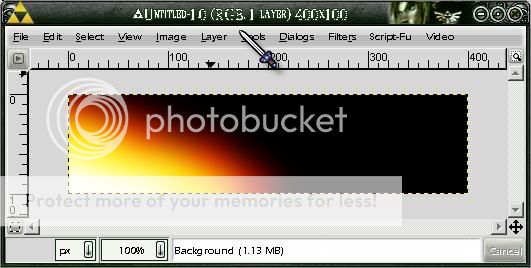
Step 4
Sure it looks bad, but watch...first flatten your image (Image > Flatten Image), then go to (Filters > Blur > Gaussian Blur), make the vertical and horizontal both 50. The end result should look like this...
Step 5
We need to make it look a lot better, so let's add something that would make it better...first make a new layer and go to (Filters > Renders > Clouds > Solid Nose). You can do whatever seed you may do whatever you want

Press OK. Now the image should overlay the first image....to overlay it, go back to menu where it has all the brushes, the cropping tool, etc. then go (File >Dialog > Layers). Click on the 2nd layer and where it says "Mode", there should be a drop-down menu, click on that and change it to "overlay". REPEAT THIS STEP ONE MORE TIME.
It should look like this...

Step 6
The fun part if about to begin! First you need to download a brush...you can download it here..
http://www.deviantart.com/deviation/52227316/
(If you don't know how to install a brush, PM me)
Flatten your image then use whatever brush you like and brush it around the fire thing and also in empty space.
This is how mine turned out:

Step 7
What we need now is a render. I usually get my renders from
www.gamerenders.com
www.planetrenders.net
Both are good sites to use.
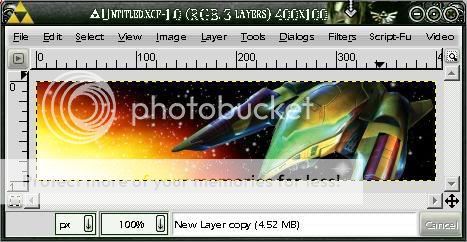
Flatten your image once again and open your render, scale it to the right size and transfer it over to your signnature.
To enhance your image, duplicate your layer (layer > duplicate layer), then go back to layers menu and on the "mode" drop down menu click "soft light" on the duplicated layer.
Before Soft Light:
After Soft Light

Step 8
Next add some text, I used the Metroid Prime Text which can be found here:
http://www.dafont.com/metroid-prime-hunte.font
I also put some tech looking brushes on there as well..
http://browse.deviantart.com/resour...ons/gimpbrushes/&order=9&alltime=yes&q=leiyla
Make sure you also....
1. Flatten Your Image
2. Add A Border
3. Save It
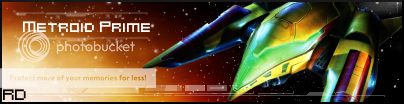
My Final Product:

This is the one i made before I did this tutorial:
Meh? The second one i just messed up on Lol!
Anyways, that concludes my tutorial, PM me if i made any mistakes or if you have comments or questions.
Step 1
To make a sig you must have an image size, so what i usually pick is 400 x 100.
Step 2
Fill the background color with black. Then make a blob of red at one of the corners with your brush. It should look something like this...
Step 3
Next, make a new layer (Layer > New Layer), then paint both yellow and white on top of the red like so...
Step 4
Sure it looks bad, but watch...first flatten your image (Image > Flatten Image), then go to (Filters > Blur > Gaussian Blur), make the vertical and horizontal both 50. The end result should look like this...
Step 5
We need to make it look a lot better, so let's add something that would make it better...first make a new layer and go to (Filters > Renders > Clouds > Solid Nose). You can do whatever seed you may do whatever you want
Press OK. Now the image should overlay the first image....to overlay it, go back to menu where it has all the brushes, the cropping tool, etc. then go (File >Dialog > Layers). Click on the 2nd layer and where it says "Mode", there should be a drop-down menu, click on that and change it to "overlay". REPEAT THIS STEP ONE MORE TIME.
It should look like this...
Step 6
The fun part if about to begin! First you need to download a brush...you can download it here..
http://www.deviantart.com/deviation/52227316/
(If you don't know how to install a brush, PM me)
Flatten your image then use whatever brush you like and brush it around the fire thing and also in empty space.
This is how mine turned out:
Step 7
What we need now is a render. I usually get my renders from
www.gamerenders.com
www.planetrenders.net
Both are good sites to use.
Flatten your image once again and open your render, scale it to the right size and transfer it over to your signnature.
To enhance your image, duplicate your layer (layer > duplicate layer), then go back to layers menu and on the "mode" drop down menu click "soft light" on the duplicated layer.
Before Soft Light:
After Soft Light
Step 8
Next add some text, I used the Metroid Prime Text which can be found here:
http://www.dafont.com/metroid-prime-hunte.font
I also put some tech looking brushes on there as well..
http://browse.deviantart.com/resour...ons/gimpbrushes/&order=9&alltime=yes&q=leiyla
Make sure you also....
1. Flatten Your Image
2. Add A Border
3. Save It
My Final Product:
This is the one i made before I did this tutorial:
Meh? The second one i just messed up on Lol!
Anyways, that concludes my tutorial, PM me if i made any mistakes or if you have comments or questions.
Last edited:
")